Parker Hydraulic Stator Design
Parker Hydraulic Stator Design
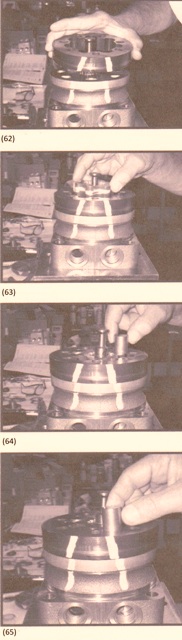
January 12, 2022 Comments Off on Parker Hydraulic Stator DesignPut the stator on the wear plate so that the seal ring is down and in it’s place (62). Make sure to align stator bolt holes with the wear plate and housing bolt holes, using your fingers just lightly tighten up bolts. Just enough to make it stable.
Put the rotor counter bore down if suitable onto the stator and wear plate with the rotor splines going into the mesh along with the drive link (10 splines). (63) Also, if the manifold side of the rotor was wrote on that side needs to be up. If no writing on it and no counter bore and uses a drive link spline, then you will need to look up the contact pattern to decide if the rotor side needs to be up against the wear plate.
Put together six vane or as many as you can to put into the stator vane pockets (64). Sometimes when you use extreme force to thrust the rotor vanes into place, it could rub some of the coating off.
Get ahold of the output end of coupling shaft with a pair of pliers and rotate coupling shaft, drive link and rotor to seat the rotor and the vanes that go into the stator. This will make enough clearance to put the seventh or full addition of seven vanes. Put the seven vanes together using a least amount of force. (65) Now take out the two bolts if they were used to preserve the stator and wear plates.
If you can assist you answering any questions, let us know by calling 800-361-0068
sales@htsrepair.com