Sundstrand Sauer Danfoss Series 20 – Manifold Installation & Removal
Sundstrand Sauer Danfoss Series 20 – Manifold Installation & Removal
July 8, 2016 Comments Off on Sundstrand Sauer Danfoss Series 20 – Manifold Installation & RemovalAt our Hydrostatic Pump Repair Site, we offer many types of Hydrostatic Transmission Repair and information relating to Hydrostatic Parts
Today we will discuss:
Sundstrand Sauer Danfoss Series 20 – Manifold Installation & Removal
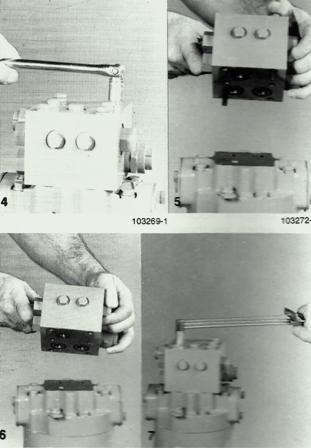
Need to get a 1/2″ wrench to take off the four bolts in the corners holding down the manifold to the motor’s end cap. Hold the manifold will doing this to prevent it from falling off. And take of the remaining two mounting cap screws.
Then take off manifold from the endcap. There is no gasket in between the manifold and motor end cap. To seal them, you will need an o ring with back rings or use square seal rings.
Always use new seals and o rings. Put lubrication on all seal rings with some petroleum jelly to make sure they stay within the grooves. Put in the larger seal rings in the grooves for the two side by side ports on the manifold. Then put in the smaller seal ring in the port with the counterbore for the orifice. If you have to a flushing flow limiter orifice, then put it in the counterbore.
Put the manifold up against the motor end cap. Put the cap screws back on, making sure the seal rings don’t slip from out of the grooves. Torque cap screws to 16 – 21 ft. lbs
Hope this is helpful, but if you have other questions, we would love to hear from you.
You can call 800-361-0068
Email: sales@hydrostatic-transmission.com